Charles Sniffning
TIP
HttpCanary is recommended for Android sniffing. It doesn't need PC or the first time only. Check HttpCanary-Android
Requirements
- Charles: support Windows, macOS, Linux, you can download from official website: https://www.charlesproxy.com/download/
- Global http proxy app
- iOS:
Potatso Lite(free),shadowrocket(paid) or others you know - Android:
Drony v1.3.x(free) or other you know, you can also download it from cloud drive(password:chaldea)
- iOS:
- FGO
- CN/TW: official game client, support iOS/Android
- JP: official apk
- NA: not supported, use Login via Account File instead.
- KR: not supported
- Android only: Android 7+ won't trust user cert, you can choose one of these solution
- Use Android 6(or lower), JP requires Android 7+
- [root] Install user cert as system cert via ADB: https://stackoverflow.com/a/46569793
- [root] magisk+JustTrustMe module
- iOS only:
- only CN/TW supported!
About Emulator
This tutorial is based on MuMu(Android 6), at least this is tested okay.
If Android version of emulator/phone is higher than 6, you need root device then copy CA cert into system cert partition using adb tool. If you are not sure or don't know how to do, please use MuMu instead.
There may be strange problems in other emulators. For example, BlueStacks doesn't have WiFi network setting and Cert Security settings, Nox doesn't capture desired https traffic. I don't know why, so if you suffer from unknown issue, please use MuMu instead.
Configure Charles

- Make sure that your Android/iOS device and the computer are in the same local area network, or the emulator and Charles are on the same computer.
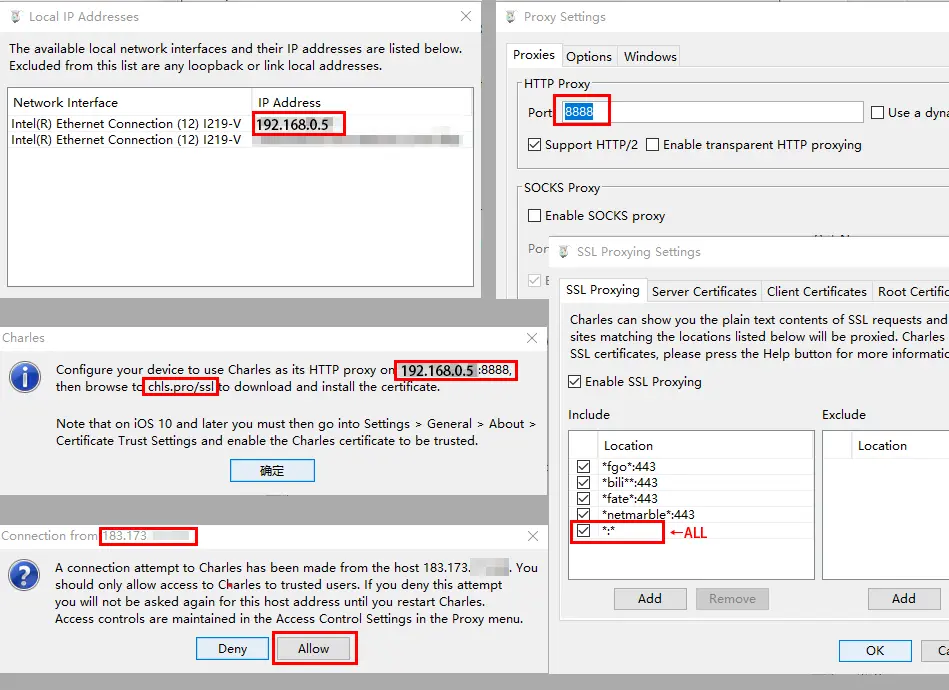
Help-Local IP Address, record the displayed local IPv4 address, such as192.168.0.5Proxy-Proxy Settings, record or modify the port, the default is8888Help-SSL Proxying-Install Charles Root Certificate on a Mobile device or Remote Browser, no operation, prompt to set up mobile proxy (192.168.0.5:8888) and certificate download addresschls.pro/ssl, see next step for detail.Proxy-SSL Proxying Settings, click to addAddinincludeon the left, enter*in host and port respectively, which means to decrypt all https traffic.- Click OK, Charles is set up, make sure that
Recordingis displayed in the bottom-right corner of Charles. - After completing the proxy setting on iOS/Android, when you connect to Charles for the first time, you will be prompted to have a remote connection
Connection from 1.2.3.4, make sure the IP here is the IP of your phone/emulator, and clickAllowto accept, otherwise it may be other trojan or crawlers in the network, clickDenyto reject.
Configure iOS
Only CN/TW supported!!!
The screenshot is only used to indicate the location of the setting item. If it is inconsistent with the following text steps, the text steps shall prevail.
iOS Certificate
Take iOS14 as an example. The settings on different iOS version may be displayed in different places, so look for them carefully.
- Connect to wifi, make sure it is in the same local area network as the computer (such as the same router or hotspot connected to the computer).
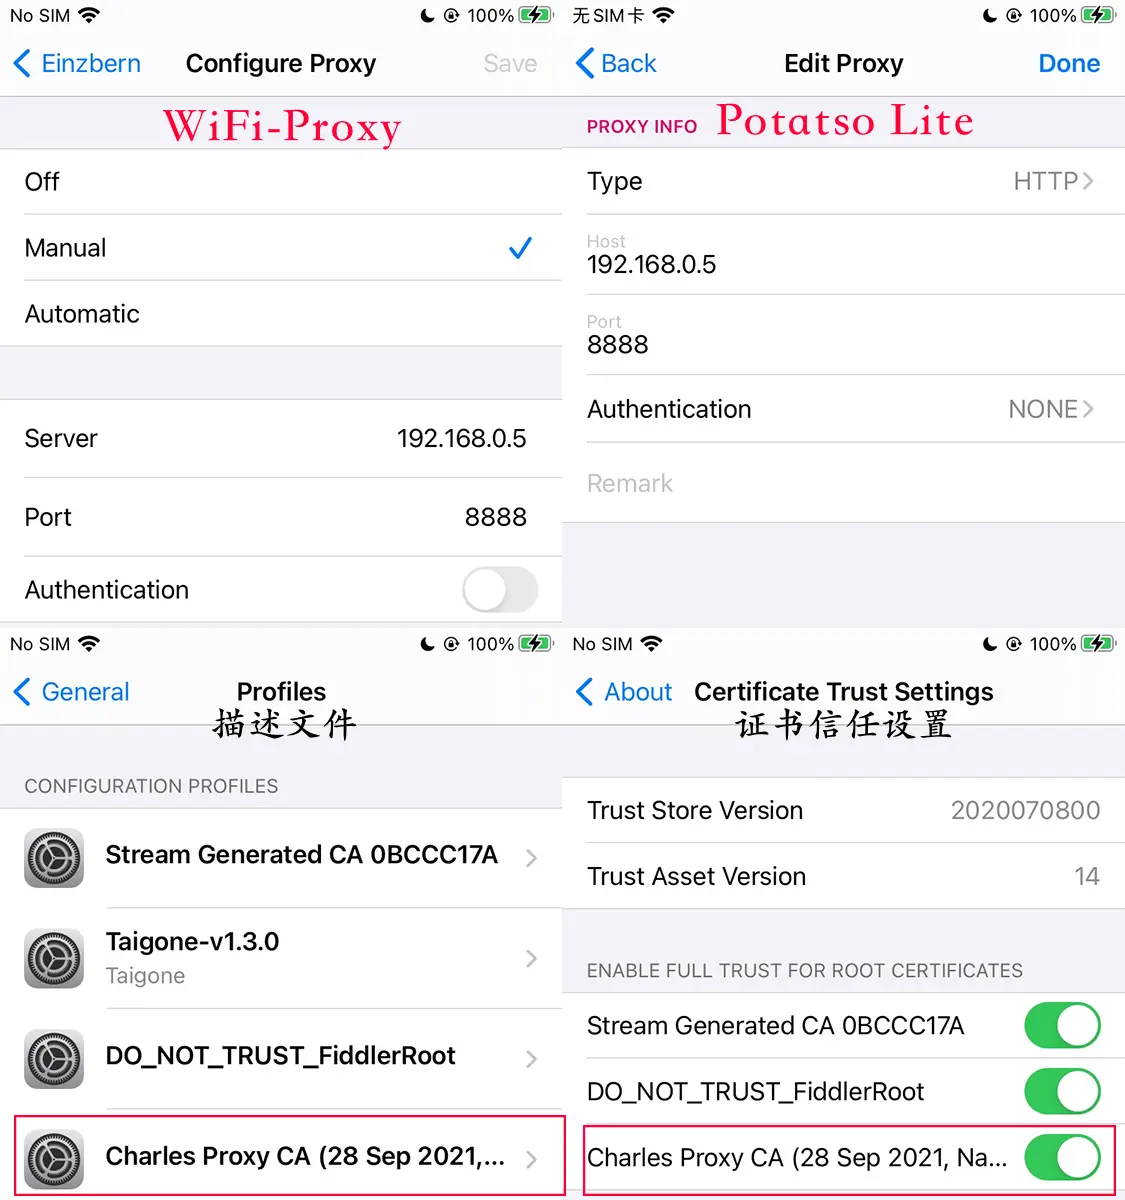
Settings-WiFi-Click the trailing icon-Configure proxy-Manual, fill in the proxy host192.168.0.5and port8888displayed in step 3 in the configuration Charles, then save.- Open Safari! Safari! It must be Safari, other browsers cannot be used. Open
chls.pro/ssl, download and install the configuration profile - Open
Settings, the top should displayDownloaded Profile, if not, you can find it inGeneral-Profiles-Downloaded Profilesand installCharles Proxy CA ****. - Open
Settings-General-About-Certificate Trust Settings, turn on Charles's certificate trust (this step is not needed for iOS 10.2 and below) - Open
https://www.bing.com/in browser, check that most of the URLs starting withhttpsin the Charles list are prefixed by a blue icon or lightning icon. If all of them are prefixed with a white lock icon, it means that it has not been decrypted. Please delete the above Profile and try again. - After the certificate is installed, the WiFi proxy can be turned off, and then the global proxy can be used later
iOS Global HTTP Proxy
- Download and install
Potatso Lite - Create a new proxy and select
manual inputmode: Type-HTTP(not https), fill in the host and port as in the previous step - Make sure
Smart Routingis disabled in Potatso settings. In other apps, you may need choose Proxy(for shadowrocket) or Global mode, PAC mode will take no effect. - Select and connect the newly created proxy. The first time you use it, it will apply for the permission to create ⅤΡΝ. Then in Charles you need to
Allowthe connection from this device.
Configure Android
The screenshot is only used to indicate the location of the setting item. If it is inconsistent with the following text steps, the text steps shall prevail.
Android Certificate
Take the MuMu emulator (Android 6.0.1) as an example, there may be differences of different emulators/mobile phones
- Use a mobile phone or emulator with Android 6 and below
- If using a mobile phone, make sure that it is in the same local area network as the computer (such as the same router or hotspot connected to the computer)
- Open
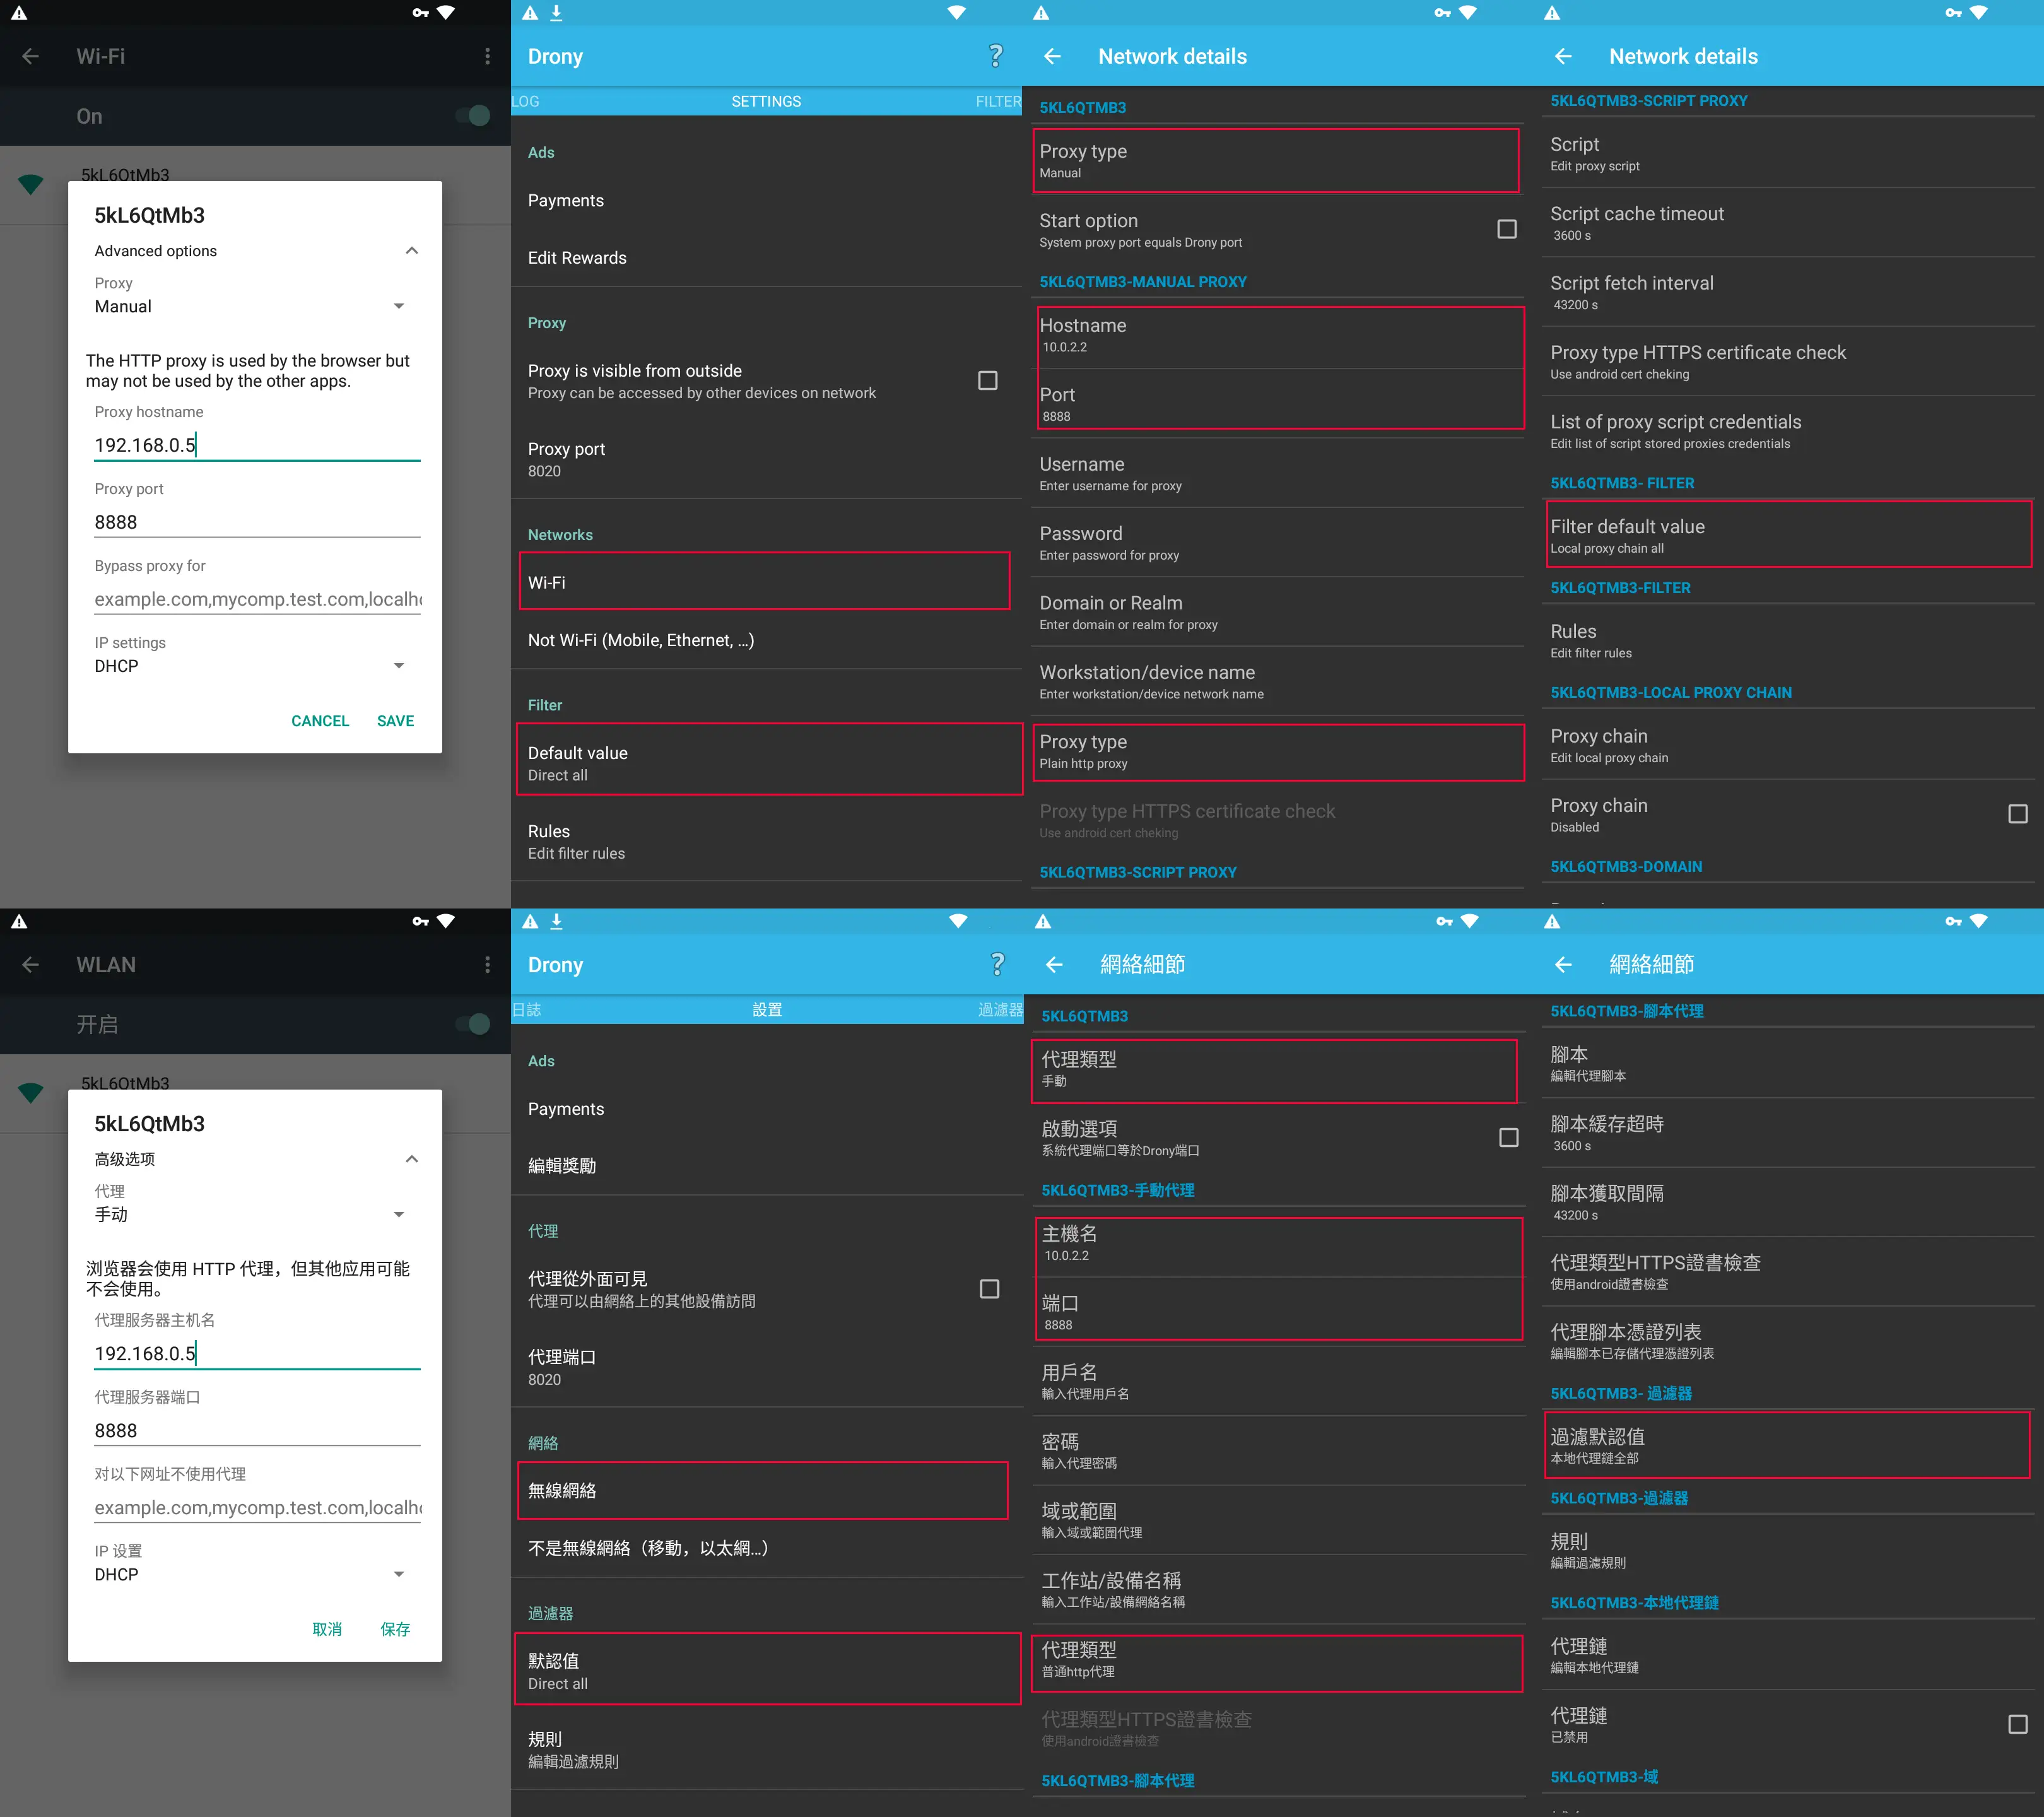
Settings-WiFi-long press or other ways to view WiFi details-modify network, select the proxymanual, and fill in the proxy host192.168.0.5and port8888displayed in step 3 of the configuration Charles, save - Open
chls.pro/sslin the browser, download the pem/crt certificate file, there are two ways to install the certificate -Open the file directly to install, sometimes it may fail -InSettings-Security-Install Certificate from SD Card, select the certificate file you just downloaded and give it a name. The default credential usage is ⅤΡΝ and application - You can find
Charles Proxy CA ****inSettings-Security-Trusted Credentials-User - Open
https://www.bing.com/in browser, check that most of the URLs starting withhttpsin the Charles list are prefixed by a blue icon or lightning icon. If all of them are prefixed with a white lock icon, it means that it has not been decrypted. Please delete the above Profile and try again. - It stands to reason that after the certificate is successfully installed, you only need to use the subsequent global proxy, and the WiFi proxy setting can be turned off
Android system proxy to download certificate in this step could also be replaced by the following global proxy
Android Global HTTP Proxy
- Download and install Drony, according to the system language display, refer to the screenshot above
- After opening, the log page and settings page will be displayed, swipe left and right to switch to the settings page
- Network-wireless network-select the connected WiFi-network details settings
- WiFi name:
Proxy typeselectManual - WiFi name-Manual Proxy:
HostnameandPortare the same as the previous step, selectPlainforProxy type - WiFi name-Filter: default value - select
Local Proxy Chain All - return
- WiFi name:
- Filter-Default: select
Direct All - Swipe left to return to the log page, click the ON/OFF switch at the bottom, you can see the ⅤΡΝ connection prompt in the notification bar after opening. The first time you use it, it will apply for the permission to create ⅤΡΝ. Then in Charles you need to
Allowthe connection from this device.
Capture and Import
Capture FGO Traffic
- Restart and login to terminal
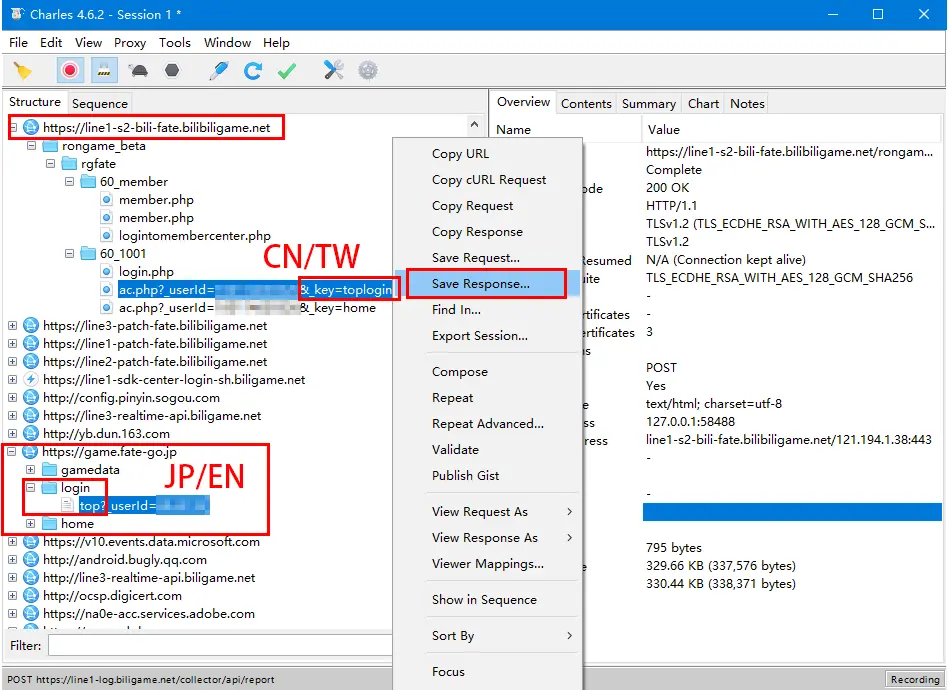
- Find the following url in Charles's list, If you can't find it, reopen FGO once or check previous steps again
- JP:
https://game.fate-go.jp/login/top?_userId=xxxx- NA:
https://game.fate-go.us/login/top?_userId=xxxx- CN: where
line3-s2-ios-fatefollows different game server channel (iOS/android/other) and geographic location are different, the most important thing is_key=toplogin
https://line3-s2-ios-fate.bilibiligame.net/rongame_beta//rgfate/60_1001/ac.php?_userId=xxxx&_key=toplogin- TW: similar to the CN server, the domain name is
https://line3-s1-all.fate-go.com.tw, to be confirmed.
- Select the above url and right click
Save Response, (note that it isResponse, do not confuse it with Request), and save it as fgo.txt (any name) - Check: Open the saved txt file with any text editor. for the JP and NA server, it is the readable json format beginning with
{. For the CN and TW server, the content is base64 encoded - a large string of alphanumeric symbols beginning withey. The default file should be utf8 encoding, only view after open, please do not edit and save which may change the encoding.
Import to Chaldea
- In
Import-HTTPS Sniffing, click on the upper right corner to import the txt file you just saved, and the data will be automatically parsed - All data is divided into: material, servants, servants in second archive, craft essences, check things to be imported according to your needs
- Filter
- Lock: By default, only locked servants are displayed and imported
- Duplicated: The same servant can have multiple cards. By default, only the one with the max active skill levels is selected. If there are duplicate servants, the acquisition date will be displayed as hint
- Click on a single servant to hide/unhide
- Click Import to update the current account data
- Click Bond to view and sort the bond level, accumulated bond value, and bond value required for the next level of each servant
Notes: The imported data is at the moment the https traffic is captured. It's not the login credentials and cannot automatically update, so the next time you need to capture the https traffic again to update.
Cleanup and next Capture
Cleanup work:
- Make sure to turn off the global proxy and the manual proxy in the WiFi settings. Otherwise, you cannot connect to the Internet after closing Charles
- Delete or turn off the certificate trust: If you delete it, you need to reinstall the certificate before the next capture; you can also keep it. For example, if iOS turns off the trust setting, you don't need to delete the profile file.
The next https traffic capture:
- Open the global proxy of Potatso/Drony, other settings remain unchanged, just turn on the switch of the proxy software
- Android: If the WiFi is changed, the settings in Drony need to be set again
- Check the certificate: If the trusted certificate has been deleted or turned off last time, reinstall or trust the certificate.
- Open Charles and FGO to capture target traffic
FAQ
- JP/NA: not supported.
- KR: not supported.
- Any feedback on this method or documents is welcomed.